
Picture this: you’re standing in the beverage aisle, holding a $4 bottle of kombucha, wondering if there’s a better way. Spoiler alert, there absolutely is! After years of perfecting fermentation techniques in my Alaska kitchen (where good probiotics are worth their weight in gold during those long winters), I can tell you that learning how to make kombucha tea at home isn’t just cost-effective, it’s surprisingly simple and incredibly rewarding.

If you’re a fan of making healthy drinks, you might also enjoy these Japanese Mounjaro Tea or even these Costa Rican Tea Recipe.
Table of Contents
Table of Contents
Understanding Kombucha and Why Homemade Beats Store-Bought
Print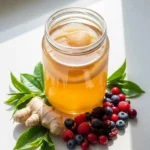
How To Make Kombucha Tea at Home
- Total Time: 7-14 days
- Yield: 16 servings
Description
Learn how to make kombucha tea at home with this simple, beginner-friendly recipe. This probiotic-rich fermented beverage costs just $0.50 per bottle to make and tastes better than store-bought versions. Perfect for families wanting healthy drinks without artificial additives.
Ingredients
- 1 gallon filtered water
- 8 black tea bags or 4 tablespoons loose black tea
- 1 cup white sugar
- 1 SCOBY (Symbiotic Colony of Bacteria and Yeast)
- 2 cups starter tea from previous batch or store-bought unflavored kombucha
- Coffee filter or cheesecloth for covering
- Rubber band for securing cover
Instructions
- Heat 4 cups of water to boiling. Remove from heat and steep tea bags for 10-15 minutes to create a strong concentrate.
- Remove tea bags and stir in sugar until completely dissolved. Add remaining 3 quarts of cool water to bring mixture to room temperature.
- Transfer cooled sweet tea to clean glass jar. Gently place SCOBY on top and add 2 cups of starter tea.
- Cover jar opening with coffee filter or cheesecloth and secure with rubber band. This allows airflow while preventing contamination.
- Place jar in a warm spot (75-85°F) away from direct sunlight. Ferment for 7-14 days, tasting after day 5 to check progress.
- When kombucha reaches desired tartness, reserve SCOBY and 2 cups liquid for next batch. Bottle remaining kombucha for second fermentation or immediate consumption.
- For flavored kombucha, add desired ingredients to bottles (ginger, fruit, herbs), seal tightly, and ferment 2-3 additional days at room temperature.
- Refrigerate finished kombucha to slow fermentation. Enjoy within 2-3 weeks for best quality and flavor.
Notes
Always use clean equipment and utensils to prevent contamination.
SCOBY may change appearance during fermentation – this is normal unless you see fuzzy mold growth.
First batch may take longer if using store-bought kombucha as starter tea.
Save extra SCOBYs in a ‘SCOBY hotel’ (glass container with kombucha) for backup or sharing.
Kombucha will continue fermenting slowly even when refrigerated.
Start with shorter fermentation times and adjust to taste preferences.
Never use metal containers or utensils during fermentation as it can damage the SCOBY.
- Prep Time: 15 minutes
- Cook Time: 0 minutes
- Category: Beverages
- Method: Fermentation
- Cuisine: Healthy
What Exactly Is Kombucha Tea?
Kombucha is essentially fermented sweet tea that’s been transformed by a symbiotic colony of bacteria and yeast (SCOBY) into a fizzy, tangy drink packed with probiotics. Think of it as tea that decided to become something magical, and honestly, that’s not too far from the truth.Like our popular homemade electrolyte drink recipe, kombucha proves that the most beneficial beverages often come from the simplest transformations.
I remember my first attempt at making kombucha. My teenage daughter was going through her “I refuse to drink anything healthy” phase, but she took one sip of my homemade ginger kombucha and asked if I could make it again. That’s when I knew I was onto something special.
Why Make Your Own Kombucha at Home?
Here’s the thing about store-bought kombucha, it’s expensive, often loaded with excess sugar, and you have zero control over the fermentation process. When you make kombucha at home, you’re not just saving money (we’re talking about $0.50 per bottle versus $4+), you’re creating something that’s perfectly tailored to your taste preferences.
Plus, there’s something deeply satisfying about watching that SCOBY do its work. It’s like having a science experiment on your counter that actually produces something delicious.
Essential Ingredients and Equipment for Perfect Kombucha

The Core Ingredients: Keep It Simple
The beauty of kombucha lies in its simplicity. You need just four basic ingredients:
Water: Use filtered water if your tap water is heavily chlorinated. Chlorine can interfere with fermentation, and nobody wants sad, sluggish bacteria.
Tea: This is where people get overwhelmed, but it doesn’t have to be complicated. Black tea works perfectly for beginners, it provides the nutrients your SCOBY needs to thrive. Green tea, white tea, or blends work too, but start with black tea until you get the hang of things.
Sugar: Yes, sugar is necessary. But here’s the beautiful part, most of it gets consumed during fermentation. I use plain white sugar because it’s what the SCOBY prefers, though organic cane sugar works too.
SCOBY + Starter Tea: This is your fermentation starter kit. You can buy one online, get one from a friend, or grow your own (though that takes patience I don’t always have).
Equipment That Actually Matters
You don’t need fancy equipment to make excellent kombucha. Here’s what I use in my kitchen:
A glass jar (1-gallon works perfectly for most families), a breathable cover (coffee filters or cheesecloth), a rubber band, and wooden or plastic utensils. Avoid metal, it can damage your SCOBY over time.
The Step-by-Step Brewing Process That Never Fails
Creating Your Sweet Tea Base
Start by brewing a strong batch of sweet tea. For one gallon of kombucha, you’ll need 8 tea bags (or 4 tablespoons of loose tea) and 1 cup of sugar. Boil 4 cups of water, steep your tea for 10-15 minutes, then stir in the sugar until it completely dissolves.
Add the remaining 3 quarts of cool water to bring your tea to room temperature. This is crucial, hot tea will kill your SCOBY, and we definitely don’t want that.
The Magic Fermentation Step
Once your sweet tea has cooled completely, transfer it to your glass jar. Add your SCOBY and 2 cups of starter tea from a previous batch (or the liquid that came with your SCOBY).
Cover with your breathable cloth, secure with a rubber band, and find a spot that’s consistently between 75-85°F. Too cool and fermentation slows to a crawl; too warm and you risk creating an environment for unwanted bacteria.
Timing, Testing, and Troubleshooting Your First Batch

The Waiting Game: How Long Is Long Enough?
First fermentation typically takes 7-14 days, depending on temperature and your taste preferences. I start testing mine on day 5 by carefully lifting the SCOBY and taking a small taste with a wooden spoon.
You’re looking for that perfect balance, still slightly sweet but with a pleasant tanginess. If it’s too sweet, give it more time. If it’s too sour, next batch needs less fermentation time.
Common Issues and How I Handle Them
Mold: This is the big scary one, but it’s actually pretty rare if you’re using clean equipment and proper ratios. Real mold looks fuzzy and is usually black, blue, or green. When in doubt, throw it out and start fresh.
SCOBY Changes: Don’t panic if your SCOBY changes color, grows thicker, or develops stringy bits. These are normal signs of a healthy, active culture.
The probiotics developing in your kombucha can actually support digestive wellness – much like the solutions we share in our guide on how to get rid of sulfur burps, proper gut health starts with understanding what’s normal and what needs attention.
No Fizz: If your kombucha isn’t fizzy enough, try a second fermentation in sealed bottles with a bit of fruit or ginger for 2-3 days.
Flavor Variations That Transform Basic Kombucha
Second Fermentation: Where the Magic Happens
This is where homemade kombucha really shines. After your first fermentation is complete, you can create endless flavor combinations. Remove your SCOBY and 2 cups of finished kombucha for your next batch, then bottle the rest.
My Go-To Ginger Kombucha Recipe: Add 1 tablespoon of freshly grated ginger to each 16-ounce bottle, seal tightly, and ferment for 2-3 days at room temperature. The result? A spicy, effervescent drink that beats any store-bought version.
Seasonal Flavor Inspirations
Living in Alaska has taught me to work with what’s available. In summer, I love adding fresh berries or herbs from my garden. Winter calls for warming spices like cinnamon and cardamom. The key is starting with small amounts, you can always add more, but you can’t take it back.
Berry Bliss: 2-3 fresh or frozen berries per bottle Citrus Zing: Peel from half an orange or lemon (no white pith) Herbal Heaven: Fresh mint, basil, or lavender (use sparingly)
Storage, Safety, and Making Kombucha a Sustainable Habit
Proper Storage for Maximum Benefit
Once your second fermentation is complete, refrigerate your kombucha to slow down fermentation. It’ll stay fresh for several weeks, though mine rarely lasts that long.
Store your SCOBY in a glass container with some finished kombucha. This “SCOBY hotel” will keep your culture healthy between batches. I keep mine on the counter and brew continuously, but you can refrigerate it for longer storage.
Building a Sustainable Kombucha Practice
The biggest mistake I see people make is trying to brew too much too soon. Start with one gallon every two weeks until you get into a rhythm. Once you’re comfortable, you can brew continuously or scale up.
My Weekly Routine: Monday is bottling day (flavoring and starting second fermentation), Thursday is testing day, and the following Monday the cycle starts again. This gives me a steady supply without overwhelming my schedule.
Safety Considerations You Can’t Ignore
Kombucha is generally very safe when made properly, but there are a few things to keep in mind. Always use clean equipment, trust your senses (if something seems off, it probably is), and remember that homemade kombucha can be more potent than store-bought versions.
If you’re pregnant, nursing, or have compromised immunity, check with your healthcare provider before diving into homemade fermentation.
Your Journey to Kombucha Mastery Starts Now
Making kombucha at home isn’t just about saving money or avoiding additives (though those are fantastic benefits). It’s about taking control of your health in a way that’s both practical and deeply satisfying. Every successful batch builds your confidence, and every flavor experiment brings you closer to creating something uniquely yours.
Morning kombucha pairs beautifully with healthy breakfasts, try it alongside our overnight oats recipe without chia seeds for a probiotic-rich start to your day that supports both digestive health and sustained energy.
The process I’ve shared here has worked for hundreds of families, from busy parents in Anchorage to health enthusiasts in warmer climates. You don’t need special skills or expensive equipment, just patience, clean practices, and a willingness to experiment.
Start with your first batch this week. Choose a simple black tea base, find a consistent spot for fermentation, and mark your calendar for taste testing in a week. By the time you’re drinking your first homemade kombucha, you’ll already be planning your next flavor adventure.
Trust me – once you taste that first sip of perfectly fizzy, tangy kombucha that you created in your own kitchen, you’ll never look at those expensive store-bought bottles the same way again.

Craving more kitchen moments and fresh recipe inspo?
Join me on Facebook and Pinterest I can’t wait to check out what you’re whipping up!
Frequently Asked Questions About Making Kombucha at Home
How to make kombucha at home for beginners?
Start simple with black tea, white sugar, and a quality SCOBY. Focus on getting your first batch right before experimenting with flavors. The key is maintaining consistent temperature (75-85°F) and using clean equipment. I always tell beginners to think of their SCOBY like a pet, it needs regular feeding (sweet tea) and a stable environment to thrive.
What are the ingredients in kombucha tea?
Traditional kombucha requires just four ingredients: filtered water, tea (black tea works best for beginners), sugar, and a SCOBY with starter tea. That’s it! The magic happens during fermentation when the SCOBY consumes most of the sugar and transforms the sweet tea into a probiotic-rich beverage. Many people are surprised by how simple the ingredient list really is.
Can you make kombucha tea?
Absolutely! Making kombucha tea at home is not only possible but surprisingly straightforward. I’ve been brewing it in my Alaska kitchen for years, and it’s become one of my family’s favorite healthy drinks. The process is more forgiving than most people think, and once you get the hang of the timing, you’ll have a continuous supply of fresh, customizable kombucha.
What is the tea ratio for kombucha?
For one gallon of kombucha, use 8 tea bags (or 4 tablespoons loose tea) with 1 cup of sugar in 4 cups of water. Then add 3 more quarts of cool water to reach room temperature. This ratio provides enough nutrients for your SCOBY while creating the perfect environment for healthy fermentation. I’ve found this ratio works consistently across different tea types and brewing conditions.